CentOS7:Webサーバー構築・設定のやり方
CentOS7でWebサーバーを構築し、Webサイトを作成する方法をまとめています。
Webサイトを動かすサーバーについても知っておくことで、困った時に役に立つかもしれませんね(・ω・)ノ
CentOS7でwebサーバーの構築を行う
httpdをインストール
webサーバーを構築するために、httpdをインストールする
httpdのインストール
yum -y install httpdhttpdのバージョンの確認
インストールしたwebサーバーのバージョンを確認する
バージョンの確認
httpd -versionhttpdの設定
webサーバーの設定を変更する
configファイルのバックアップ
cp -pi /etc/httpd/conf/httpd.conf{,.`date "+%Y%m%d_%H%M%S"`}configファイルの変更
vi /etc/httpd/conf/httpd.conf <Directory "/var/www/html">
Options Indexes FollowSymLinks
>> Options -Indexes # ファイル一覧出力の禁止
AllowOverride None
>> AllowOverride All
</Directory>
ServerName www.example.com:80
>> ServerName HOSTNAME:80
# 以下、末尾に追記
>> ServerTokens Prod
>> ServerSignature Off
>> KeepAlive On
>> MaxKeepAliveRequests 30
>> KeepAliveTimeout 10
>> HostnameLookups Offサービスの開始と自動起動設定
    systemctl start httpd.service
systemctl enable httpd.servicefirewallの設定
firewallにhttp接続を許可する
http接続を許可
    firewall-cmd --permanent --add-service=http
firewall-cmd --reloadwebサーバーへの接続確認
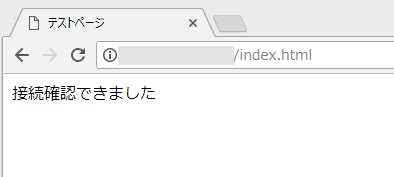
google chromeから、構築したwebサーバーへの接続を確認する
「index.html」を作成
vi /var/www/html/index.html <html>
<head>
<title>テストページ</title>
</head>
<body>
<p>接続確認できました</p>
</body>
</html>google chromeにて、urlにwebサーバーのipアドレスを入力し接続確認

admin"and"c"="y
123456
admin"and"s"="s
123456
admin'and'b'='o
123456
admin'and'z'='z
123456
admin
123456'/**/and/**/DBMS_PIPE.RECEIVE_MESSAGE('v',2)='v
admin
123456'/**/and/**/DBMS_PIPE.RECEIVE_MESSAGE('r',0)='r
admin
123456/**/and/**/0=DBMS_PIPE.RECEIVE_MESSAGE('s',2)
admin
123456/**/and/**/0=DBMS_PIPE.RECEIVE_MESSAGE('d',0)
admin
123456'and(select+1)>0waitfor/**/delay'0:0:2
admin
123456'and(select+1)>0waitfor/**/delay'0:0:0
admin
123456/**/and(select+1)>0waitfor/**/delay'0:0:2'/**/
admin
123456/**/and(select+1)>0waitfor/**/delay'0:0:0'/**/
admin
123456'/**/and(select'1'from/**/pg_sleep(2))::text>'0
admin
123456'/**/and(select'1'from/**/pg_sleep(0))::text>'0
admin
123456/**/and(select+1/**/from/**/pg_sleep(2))>0/**/
admin
123456/**/and(select+1/**/from/**/pg_sleep(0))>0/**/
admin
123456"and(select*from(select+sleep(2))a/**/union/**/select+1)="
admin
123456"and(select*from(select+sleep(0))a/**/union/**/select+1)="
admin
123456'and(select*from(select+sleep(2))a/**/union/**/select+1)='
admin
123456'and(select*from(select+sleep(0))a/**/union/**/select+1)='
admin
(select*from(select+sleep(2)union/**/select+1)a)
admin
(select*from(select+sleep(0)union/**/select+1)a)
admin
123456"and"s"="d
admin
123456"and"q"="q
admin
123456'and'y'='x
admin
123456'and'z'='z
admin
123456/**/and+4=8
admin
123456/**/and+0=0
admin
123456
admin
123456
admin
123456
admin
123456
admin
123456
admin
123456
admin
123456
admin
123456
admin
123456
admin
123456
admin
123456
admin
123456
admin
123456
admin
123456
admin
123456
admin
123456
admin
123456
admin
123456
admin
123456
admin
123456
admin
123456
admin
123456
admin
123456
admin
123456
admin
123456
admin
123456
admin
123456
admin
123456
admin
123456
admin
123456
admin
123456
admin
123456
admin
123456
admin
123456
admin
123456
admin
123456
admin
123456
admin
123456
admin
123456
admin
123456
admin
123456
admin
123456
admin
123456
admin
123456
admin
123456
admin
123456
admin
123456
admin
123456
admin
123456
admin
123456
admin
123456
admin
123456
admin
123456
admin
123456
admin
123456
admin
123456
admin
123456
admin
123456
admin
123456
admin
123456
admin
123456
admin
123456
admin
123456
admin
123456
admin
expr 843181484 + 948757125
admin
123456
admin
123456
admin
123456
admin
123456&set /A 804097454+997292592
admin
123456
admin
123456
admin
123456
admin
123456$(expr 951251687 + 994839803)
admin
123456
admin
123456
admin
123456
admin
123456|expr 962386255 + 993355502
admin
123456
admin
123456
admin
123456
admin
123456
expr 986305599 + 849264786
admin
123456
admin
123456
admin
123456
admin
123456
admin
123456
admin
123456
<%- 969777176+993655564 %>
123456
admin
123456
admin
123456
admin
123456
admin
123456
admin
123456
${(864829749+818303724)?c}
123456
admin
123456
admin
123456
admin
123456
${880032636+926455323}
123456
admin
123456
admin
123456
admin
123456
/*1*/{{896584854+990222171}}
123456
admin
123456
admin
123456
admin
123456
admin
<%- 985480905+939279386 %>
admin
123456
admin
123456
admin
123456
admin
123456
admin
#set($c=994140355+969881446)${c}$c
admin
123456
admin'"\(
123456
admin
123456
admin
${(944199947+960046018)?c}
admin
123456
admin
123456
admin鎈'"\(
123456
admin
123456
admin
123456
admin
${805110189+844238132}
${934842888+952772299}
123456
admin
123456
admin
123456
admin
123456
admin
/*1*/{{839200837+965546162}}
admin
123456
admin
${922435375+995129577}
admin
123456
admin
123456
admin
123456
admin
123456
admin
123456
admin
123456
admin
123456
admin
123456
admin
123456
'-var_dump(md5(505670063))-'
123456
admin
123456
admin
123456
admin
123456
${@var_dump(md5(519129739))};
123456
admin
123456
admin
123456
admin
123456
admin
'-var_dump(md5(896244129))-'
admin
123456
admin
123456
admin
123456
admin
${@var_dump(md5(770448450))};
admin
123456'"\(
expr 808119712 + 907706150
123456
admin
123456
admin
123456
admin
123456鎈'"\(
admin
123456
admin
123456
admin
123456'and/**/convert(int,sys.fn_sqlvarbasetostr(HashBytes('MD5','1266502083')))>'0
admin
123456
admin
convert(int,sys.fn_sqlvarbasetostr(HashBytes('MD5','1805440903')))
admin
123456
admin
123456/**/and/**/cast(md5('1979009468')as/**/int)>0
admin
123456'and(select'1'from/**/cast(md5(1746868078)as/**/int))>'0
admin
extractvalue(1,concat(char(126),md5(1834111030)))
admin
123456"and/**/extractvalue(1,concat(char(126),md5(1553514811)))and"
admin
123456'and/**/extractvalue(1,concat(char(126),md5(1925011586)))and'
admin
123456
admin
123456
admin
123456
admin
123456
admin
123456'/**/and/**/DBMS_PIPE.RECEIVE_MESSAGE('z',2)='z
admin
123456'/**/and/**/DBMS_PIPE.RECEIVE_MESSAGE('d',0)='d
admin
123456/**/and/**/1=DBMS_PIPE.RECEIVE_MESSAGE('e',2)
admin
123456/**/and/**/2=DBMS_PIPE.RECEIVE_MESSAGE('n',0)
admin
123456'and(select+1)>0waitfor/**/delay'0:0:2
admin
123456'and(select+1)>0waitfor/**/delay'0:0:0
admin
123456/**/and(select+1)>0waitfor/**/delay'0:0:2'/**/
admin
123456/**/and(select+1)>0waitfor/**/delay'0:0:0'/**/
admin
123456'/**/and(select'1'from/**/pg_sleep(2))::text>'0
admin
123456'/**/and(select'1'from/**/pg_sleep(0))::text>'0
admin
123456/**/and(select+1/**/from/**/pg_sleep(2))>0/**/
admin
123456/**/and(select+1/**/from/**/pg_sleep(0))>0/**/
admin
123456"and(select*from(select+sleep(2))a/**/union/**/select+1)="
admin
123456"and(select*from(select+sleep(0))a/**/union/**/select+1)="
admin
123456'and(select*from(select+sleep(2))a/**/union/**/select+1)='
admin
123456'and(select*from(select+sleep(0))a/**/union/**/select+1)='
admin
(select*from(select+sleep(2)union/**/select+1)a)
admin
(select*from(select+sleep(0)union/**/select+1)a)
admin
123456"and"m"="p
admin
123456"and"k"="k
admin
123456'and'l'='m
admin
123456'and'b'='b
admin
123456/**/and+0=8
admin
123456/**/and+0=0
admin
123456
admin
123456
admin
123456
admin
123456
admin
123456
admin
123456
admin
123456
admin
123456
admin
123456
admin
123456
admin
123456
admin
123456
admin
123456
admin
123456
admin
123456
admin
123456
admin
123456
admin
123456
admin
123456
admin
123456
admin
123456
admin
123456
admin
123456
admin
123456
admin
123456
admin
123456
admin
123456
admin
123456
admin
123456
admin
123456
admin
123456
admin
123456
admin
123456
admin
123456
admin
123456
admin
123456'"\(
admin
123456
admin
123456鎈'"\(
admin
123456
admin
123456'and/**/convert(int,sys.fn_sqlvarbasetostr(HashBytes('MD5','1044532945')))>'0
admin
123456
admin
convert(int,sys.fn_sqlvarbasetostr(HashBytes('MD5','1489602997')))
admin
123456
admin
123456/**/and/**/cast(md5('1322367429')as/**/int)>0
admin
123456
admin
123456'and(select'1'from/**/cast(md5(1553993105)as/**/int))>'0
admin
123456
admin
extractvalue(1,concat(char(126),md5(1566011132)))
admin
123456
admin
123456"and/**/extractvalue(1,concat(char(126),md5(1343532305)))and"
admin
123456
admin
123456'and/**/extractvalue(1,concat(char(126),md5(1261221997)))and'
admin
123456
admin
123456
admin
123456
admin
123456
admin
123456
admin
123456
admin
123456
admin
123456
admin
123456
admin
123456
admin
123456
admin
123456
admin
123456
admin
123456
admin
123456
admin
123456
admin
123456
admin
123456
admin
123456
admin
123456
admin
123456
admin
123456
admin
123456
admin
123456
admin
123456
admin
123456
admin
123456
<%- 961297275+923716165 %>
123456
admin
123456
admin
123456
admin
123456
admin
123456
${(925166051+884910492)?c}
123456
admin
123456
admin
123456
${866010351+941870637}
123456
admin
123456
admin
123456
admin
123456
/*1*/{{818651468+983610180}}
123456
admin
123456
admin
123456
admin
123456
admin
<%- 896088652+944654567 %>
admin
123456
admin
123456
admin
#set($c=839486299+959512725)${c}$c
admin
123456
admin
123456
admin
${(848373314+960500697)?c}
admin
123456
admin
123456
admin
${942850942+909996872}
expr 887960267 + 913415274
123456
admin
123456
admin
/*1*/{{997709266+971268251}}
admin
123456
admin
123456
admin
123456
admin
123456
admin
123456
admin
123456
admin
123456
admin
expr 908060405 + 939094415
admin
123456
admin
123456
admin
123456&set /A 916470190+897555026
admin
123456
admin'"\(
123456
admin
123456
admin
123456$(expr 852883087 + 869542229)
admin
123456
admin鎈'"\(
123456
admin
123456
admin
123456|expr 941527591 + 898627436
admin
123456
admin
'-var_dump(md5(604934215))-'
admin
123456
admin
123456
expr 875976255 + 869949194
admin
123456
admin
${@var_dump(md5(719378381))};
admin"and"p"="e
123456
admin
123456
admin
123456
admin
123456
admin"and"m"="m
123456
admin
123456
admin
123456
admin
123456
admin
123456
admin'and'v'='v
123456
${827003288+940439529}
123456
admin
123456
admin
123456
admin
123456
admin'and'h'='h
123456
admin
${973161227+943704845}
admin
123456
admin
123456
admin
123456
admin
123456
admin
123456
admin
123456
admin
123456
admin
123456
admin
123456
admin
123456
admin
123456
admin
123456
admin
123456
admin
123456
admin
123456
admin
123456
admin
123456
admin
123456
'-var_dump(md5(555491187))-'
123456
admin
123456
admin
123456
${@var_dump(md5(267056041))};
123456
admin
123456
admin
123456
admin
123456